Run "Android" in your PC/laptop with minimum requirements (512mb ram) and no lag
Hi viewers i am here to help you out in installing android in your PC/Laptop. Here you can learn how to install/Boot an another OS (DUAL OS) in your PC.Now i am not going to waste your time by saying you to install (bluesta**/Nostac*/Or any other emulators that simply waste your time by loading for hell of time.Now I am not going to suggest you emulators that make your PC run in a wrecked way.Most of the emulators make your PC slow and consumes your computer memory as much it can stop other processes from taking place.now i have an solution for your worries.

when i was young i was in need of an android device that was not in my home hence i came with an idea of booting an Android OS in an old Computer which i thought was useless that time as it has very low ram and no graphics.For years I was installing Emulators and trying to bring me a android device.After an year i came up with an idea of dual booting my computer with an Android OS. Now this computer has became one of my favorite as it can full fill all my needs as it has Windows 10 ,Android 6.0 and IOS 8.4 .For this you are required to download ANDROID ISO file from (https://www.android-x86.org/) and then you need to download a software to create bootable disc with UNetbootin (https://filehippo.com/download_unetbootin/) OR with (https://rufus.ie/).
Basic requirements for Installing Android In PC/Laptop:
- A personal computer(PC)/Laptop:
- Ram: Minimum 512mb
- Rom or internal storage: minimum 2Gb
- Create a disc partition with new volume with minimum 3GB.
- windows with minimum windows 7 OS.
- UNetbootin or Rufus.
- a Pen drive with minimum 1Gb storage.
How to DUAL Boot Android in PC/Laptop:
- first of all you need is a USB /pen drive.
- Connect it to the computer.Then install UNebootin or Rufus on your computer.
- After installing the software run the software. You will be able to see a window appearing as shown below.

- Now choose the label of the pen drive:
- # for example; (new volume:g)#

- Browse the file which is to be booted clicking the icon.
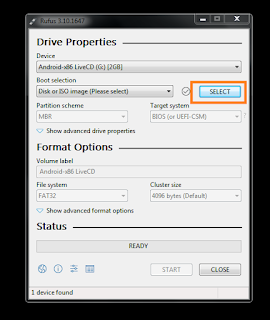

- Now the pen drive is ready to boot and click start. be sure that there is no file in this pen-drive as it will be formatted. please wait patiently until it will be finished.

- After completion it acquires a new label as" Android-x86" your USB is now ready to boot .
- create a boot partition with upto 4GB of space.
- if you need help in creating a partition use this video link: (https://www.youtube.com/watch?v=pdHjolzl7Gk)
- once a partition is created format it once.
- now restart your computer with USB/pen drive plugged in.
- after restart
- press the required button to enter boot manager in your device
- for example in HP f-9 is the boot manager
- once you enter boot manager please click on USB hard disk as shown:

- Once you have clicked in "usb hardware " there appearance an another prompt with 4 options "click on the installation of disk in hardware" which must be the last option.

- After that click on the volume you created and formatted by you and press OK button


- After that,click on do not format as you have already formatted it. then press OK and proceed.

- Then a prompt appears saying that whether to create windows grub loader or not please don't skip this is the most important point in installation.please click OK.


- After that another prompt with message install EFi-grub loader appears please select skip.
now its time to make your disk ready for dual boot:


- Once you finish all of this only a few steps will be more please be patient and don't interrupt your computer during these processes.
- The last step is to type the size for creating data please provide full data space.
- Example type: "2047".

- After this it take a few minutes to complete after completion please click on run Android-x86 to proceed in to your dream device.


0 Comments